(THIS TUTORIAL IS FOR VERSIONS 2.0.0 AND NEWER)
These are the Instructions to configure our Constant Contact Signup Majix Pro Module.
This tutorial was updated based on version 2.1.7 of this Module using Joomla 3.3.6
PLEASE NOTE:Most text fields where you see "MOD_CCSIGNUP_MAJIX_PRO..." are using language constants that can easily be changed by adding your own language file or replacing the constant with your own text.
Also, after the initial installation of this module, not all parameters will be visible. Some will only show after enabling certain other parameters.
Choosing Lists - Missing Plugin
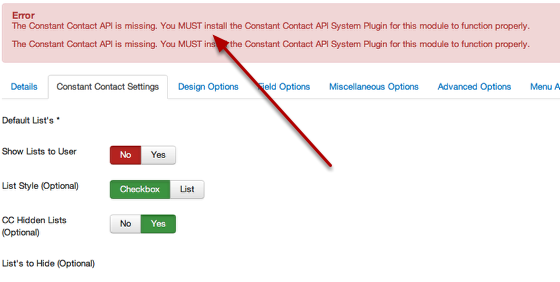
If you see the error "The Constant Contact API is missing. You MUST install the Constant Contact API System Plugin for this module to function properly.", then you haven't installed the required Constant Contact API System Plugin. Please review this tutorial for more details about using our Constant Contact API System Plugin.
Choosing Lists - Register your website with Constant Contact

If you see the message above "Please Authenticate, You must authenticate and register your website to select lists", this means that you have not finished configuring the required Constant Contact API System Plugin. Please review this tutorial for more details about using our Constant Contact API System Plugin.
Resetting an Access Token
To remove or reset an 'Access Token', Please review this tutorial for more details about using our Constant Contact API System Plugin.
Constant Contact Settings
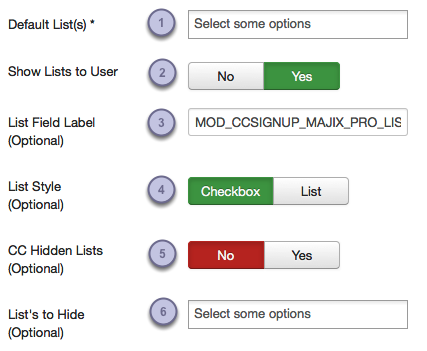
This tab of parameters is where you specify the settings related to your Constant Contact Account:
- Choose what lists a user will be subscribed to when they signup using the form.
- You have the option to show the lists to the user so they can pick for themselves.
- Enter the text that you want to show for the "List Field" Label. You can leave the default from the language file, enter custom, or change the default text in the language file.
- If you decide to show the lists, Choose how they will appear. Either in a Checkbox list, or a Multi-select list.
- If you decide to show the lists, You can use the settings from your Constant Contact Account that determine which lists will show.
- If you decide to show the lists and you set item #5 to NO, You can choose any lists to hide. Additionally, if you show a list in step #1 that you want hidden, simply choose that same list here and the user will be automatically subscribed without having the option to decline that list.
Design Settings - Design Options
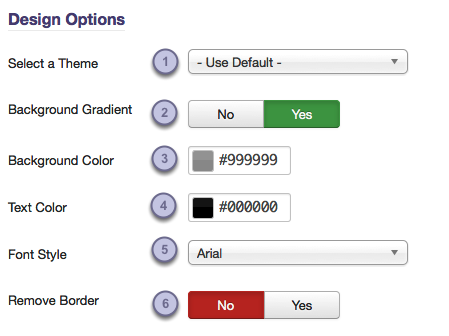
This tab of parameters is where you specify both Design Options & Field Options:
PLEASE NOTE: Currently there are 3 themes that come with this module. 1) The default theme that is pretty basic. 2) A colorful theme that adds a background color or your choosing. 3) A Single-Line theme that creates a compact form. If you choose the Single-Line theme, not all of the Design & Field Options will be available.
- Choose a theme "Default, Colorful, or Single-Line"
- (Only available with the 'Colorful' theme) This will add a gradient PNG that adds a level of color shading.
- (Only available with the 'Colorful' theme) Using the color picker, this changes the background color to the hexadecimal value chosen.
- Using the color picker, this changes most of the text (labels, etc) within the module.
- You have a selection of a web-safe fonts and Google fonts to apply to the labels.
- Some Joomla! Templates add a border to the <fieldset> tags, set this to yes, to force remove a border from the module position.
Design Settings - Label & Field Options
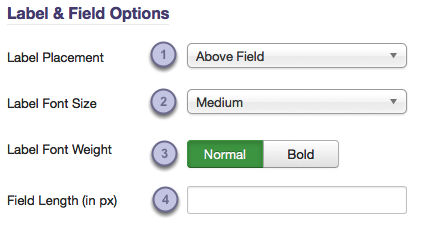
- Choose if you want the labels to appear above each field, or inside the field as a text placeholder. (For browser compatibility, we are using jQuery. There may be unexpected results with this feature if you do not have jQuery installed).
- Used to change the font size of the labels (does not change label font sizes if you choose to have labels Inline).
- If desired, make any font bolder.
- Enter a pixel value to change the field lengths. Most modern templates use css to determine field lengths, so we added this to override your template css if needed.
Standard Fields (part one)
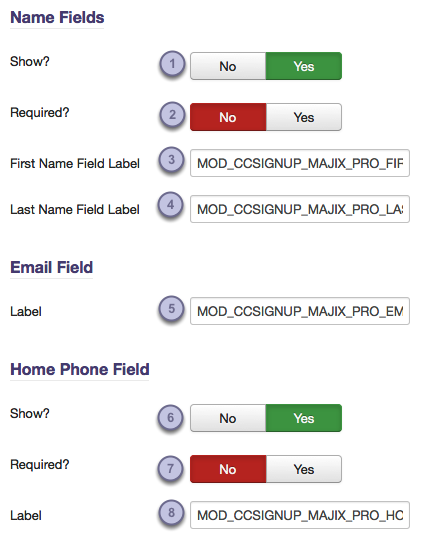
This tab of parameters is where you specify the Standard Fields Options:
- Select 'Yes' to show the "First & Last Name" labels & fields.
- Select 'Yes' if you want the "First & Last Name" fields to be required.
- Enter the text that you want to show for the "First Name" label. You can leave the default from the language file, enter custom, or change the default text in the language file.
- Enter the text that you want to show for the "Last Name" label. You can leave the default from the language file, enter custom, or change the default text in the language file.
- Enter the text that you want to show for the "Email" label. You can leave the default from the language file, enter custom, or change the default text in the language file.
- Select 'Yes' if you want the "Home Phone" field to show.
- Select 'Yes' if you want the "Home Phone" fields to be required.
- Enter the text that you want to show for the "Home Phone" label. You can leave the default from the language file, enter custom, or change the default text in the language file.
Standard Fields (part two)

For sake of space in this tutorial, we only list the different options for Home Phone, however, all the rest of the Standard Fields have the same options once you choose to show that field.
- Select 'Yes' if you want the "Work Phone" field to show.
- Select 'Yes' if you want the "Cell Phone" field to show.
- Select 'Yes' if you want the "Fax" field to show.
- Select 'Yes' if you want the "Job Title" field to show.
- Select 'Yes' if you want the "Company Name" field to show.
Custom Fields
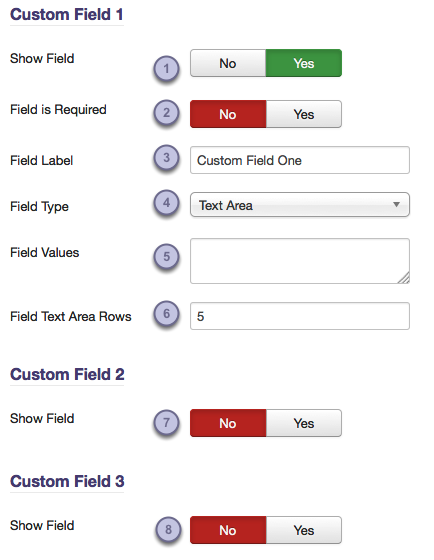
This tab of parameters is where you specify the Custom Fields Options:
There are 3 Custom Fields that can be used to store data in the contacts profile. For sake of space in this tutorial, we only list the different options for Custom Field 1, however, Custom Field 2 & Custom Field 3 have the same options once you choose to show that field.
- Select 'Yes' if you want the "Custom Field 1" to show.
- Select 'Yes' if you want the "Custom Field 1" to be required.
- Enter the Field Label text for "Custom Field 1".
- Choose what type of field the "Custom Field 1" will be. Either a text field (single row), a text area (multiple rows), or a dropdown list.
- If you choose a 'dropdown list' for the field type, enter the values that will show in this list. Each value must be seperated by a pipe "|" and each pair must be seperated by a return (line break). See example below...
- If you choose to show the custom field as a text area, enter the amount of rows that you want to show. Please note that some Themes will set this value and it might not be able to be overridden.
- Select 'Yes' if you want the "Custom Field 2" to show.
- Select 'Yes' if you want the "Custom Field 3" to show.
Parameter Example for Custom Field as Dropdown List
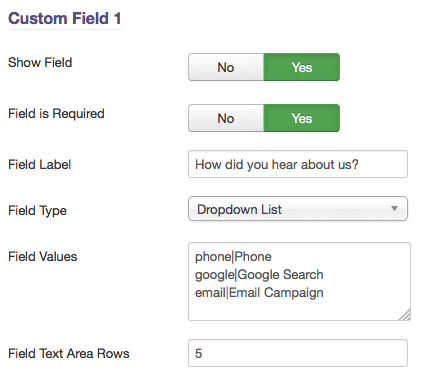
"How did you hear about us?"
phone
|Phone
google
|Google Search
email
|Email Campaign
Please note that there should NOT be any spaces in the first value used as the form could break. You are allowed to use spaces in the display value.
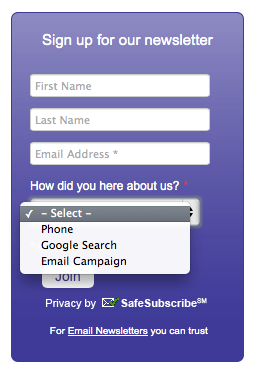
Form Example for Custom Field as Dropdown List
Miscellaneous Settings (part one)
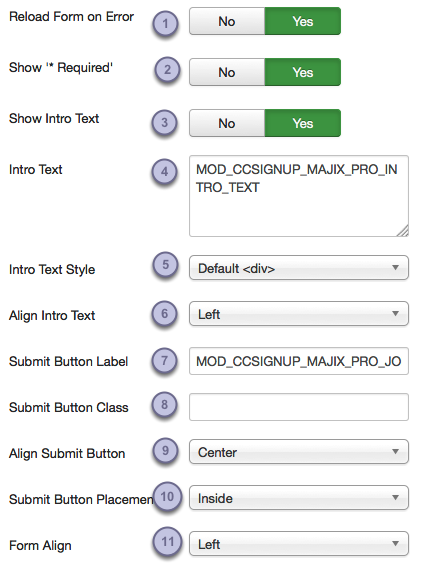
This tab of parameters is where you specify the Miscellaneous Options:
- By Default, the form will be show again, if there are any errors. You can choose not to show the form if there are any errors after the user submits the form.
- Select 'Yes' if you want to show the word 'Required' along with the asteric to show the user that fields with an asteric are required.
- Enter the text that you want to show at the top of your signup form. (You can leave the default from the language file, enter custom, or change the default text in the language file.)
- Select 'No' if you do not want to show the intro text.
- Select a style, the preset styles are either a div, paragraph or a header tags from 1 to 5. The last option is to Embed the Module into an article (please see this tutorialfor additional instuction on embedding)
- Select the alignment of the intro text. (Left, Center or Right)
- Enter the text that you want to show for the 'Submit' Button Label. You can leave the default from the language file, enter custom, or change the default text in the language file.
- (Optional) You can add a CSS class to the button. Some themes have 'button' (or btn btn-primary) as a CSS class to allow all site form buttons to have the same look.
- Choose the button alignment (Left, Center or Right)
- (Optional) Choose the button placement (Inside or Outside). NOTE: This will only be applied if you choose a colorful theme.
- Choose how you want to align the form. This was added mostly to help style embedded forms.
Miscellaneous Settings (part two)
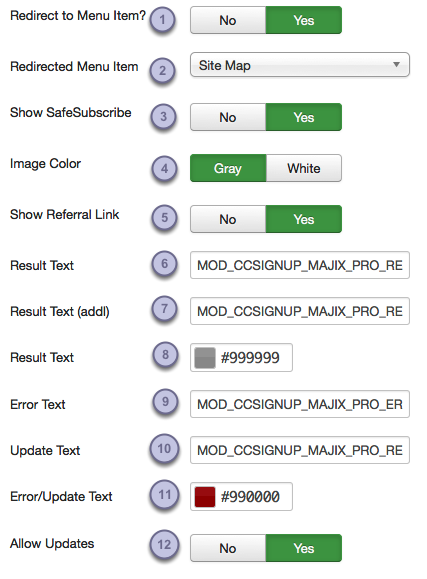
- Choose if you would like the form to redirect to a page / menu item of your choosing. Helpful to add a custom thank you page. NOTE: The module position MUST exist on the redirect page or the submittal will not be added to your Constant Contact account.
- Choose the menu item to redirect to.
- Select 'Yes' if you want to show Constant Contacts 'SafeSubscribe' Image.
- Depending on the color of the them you choose, you can select a gray image or a white imge for the Contact Contact 'SafeSubscribe' image and text.
- Select 'No' if you would rather not show the referral link to new accounts with Constant Contact. (By leaving set to 'Yes', you help us get credit for referrals.)
- Enter the text that you want to show for the 'Result' text. This is the text that will be shown to the user after a successful registration. You can leave the default from the language file, enter custom, or change the default text in the language file.
- Enter the text that you want to show for the additional 'Result' text.
- Choose the color for the 'Result' text.
- Enter the text that you want to show for the 'Error' text. This is the text that will be shown to the user if there is an unsuccessful registration. You can leave the default from the language file, enter custom, or change the default text in the language file.
- Enter the text that you want to show for the 'Update' text. This is the text that will be shown to the user after a successful submittal and the contact already existed. You can leave the default from the language file, enter custom, or change the default text in the language file.
- Choose a color for the 'Error/Update' text.
- Select 'No' if you do not want a contact to be updated if their email address already exists.
'Other' Tab
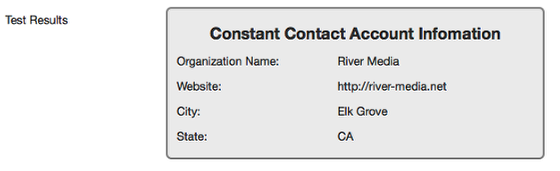
The last tab simply shows the account information of the Constant Contact account that was used to authenticate with. This is for information purposes only and to verify that the module is connected to the correct account.
This document was created using ScreenStepsfrom BlueMango Learning Systems, LLC